Welcome to the plyometric pushup series! If you’d like to learn how to do a clapping pushup then you’ve landed on the right page. Clapping pushups are a subset of plyometric pushups, and they are an excellent progression from standard pushups.
Not only that, but they build lots of power and are fun to perform. Depending on the type of clapping pushup variation you do, they can be categorized as an intermediate or advanced level movement.
In this tutorial, we will specifically focus on clapping pushups – going from the basic clap all the way to advanced behind-the-back variations. Let’s get started!
⚠️ Prerequisites
As a general pre-requisite, you should be able to get at least 30 clean basic pushup reps without pause before attempting to move on to plyo work.
It’s also not a bad idea to have familiarity and comfort with wrist pushups as well. The reason being is that the impact from plyometric pushups can put a strain on weak wrists, but if you can do wrist pushups for reps, then you likely have sturdy enough wrists to handle it.
Table of Contents
- Building a Foundation for Plyometric Pushups
- Clapping Pushups Tutorial
- How to Do Advanced Clapping Pushups
Building a Foundation for Plyometric Pushups
The foundation for all plyometric pushups begins with the most basic plyo-pushup which is simply to push yourself off of the ground as hard as you can on the up phase of the pushup, and remove your hands from the ground for a brief split second. You then land back on your hands and catch yourself on the ‘fall.‘
If you have the pre-requisite strength, these are generally a fairly easy variation for most people to ease into. The only difficult aspect might be what was mentioned above – folks who have weak wrists. If that’s you, then head on over to the playing with hands tutorial and get ya learn on!
Once you develop some general comfort with the standard plyometric pushup mentioned above, you can proceed in a number of different ways.
Most people will probably move on to the basic clapping pushup, but you can also try three other plyo pushup variations before that (or at the same time). The first involves no additional equipment.
The other two both require some additional apparatus.
One involves putting some sort of elevated, sturdy object in front of you. Benches work well here.
The other is the use of some decently tall parallettes.
Read below to understand the technique for each one and then check out the videos underneath to see me demonstrating what they look like.
Plyometric Pushup Variation #1
As you can see below, this one is straightforward. Launch yourself up and make sure you push hard enough off the floor to give yourself enough hangtime to touch opposite shoulders in mid-air. Then catch yourself in the standard pushup position on the way back down.
Plyometric Pushup Variation #2
Here is how to do it:
-
Position your body so that the bench in front of you is about an arm’s length away when you are in the pushup position.
-
Lower yourself like you normally would, but on the way up explode and try to tap the top of the bench with both hands for a brief second before releasing and pulling your hands back in to catch yourself as you fall back to the floor.
For an added challenge to your core, instead of just tapping, try to actively press down with your hands when you make contact with the bench, and hold the position for 1-3 seconds before releasing for the fall and the start of your next rep.
Plyometric Pushup Variation #3
This is how to do the other variation:
-
Place the parallettes by the sides of your arms so they are a bit wider than they would be if you were just using them for regular pushups. You need some breathing room as you explode and you don’t want to knock them out of the way if they are too close to your body.
-
Lower yourself like usual. Then on the way up explode, reach out to the sides to grap the parallettes and finish out the press. Pause for maybe a half a second at the top and then release your hands back to the middle (in-between the parallettes) as you fall down and catch yourself for your next rep.
When you combine the second and third variations into one set, it looks like this:
Plyometric Pushups
Did you know that plyometric pushups have been shown to increase 1RM bench press strength more than actually bench pressing? You can read the abstract of the actual study yourself, or read this much more digestible synopsis in GQ that covers it. From GQ:
17 resistance-trained men were selected and assigned into two groups. One group followed a traditional strength training protocol for eight weeks while the other combined traditional strength training with plyometric push-ups.
Following the eight weeks, the athletes were tested on the bench press: although both groups improved, the traditional strength training group increased by 7.1 per cent on average compared to 11.6 per cent for the plyometric push-up training group.
In addition, in a separate study, when performed just prior to testing 1RM bench press, plyometric pushups significantly increased how much participants could bench compared to just doing the bench press.
Clapping Pushups Tutorial
Clapping pushups are typically the default plyometric pushup move that most people try when they dive into the world of plyo-pushups. The very basic clap-in-front-of-your-body variety is only a tiny step up from the foundational plyometric pushup (the one where you explode and briefly release your hands from the ground). You just need a little bit more explosiveness and some hand speed to pull it off.
This is how you do it.
-
Get comfortable with the basic (hand release) plyo pushup. If you can’t do that, then you aren’t ready for the clapping pushup.
-
Practice your clapping hand speed outside of the pushup. To prep your CNS (Central Nervous System) for the clap, from a standing position put your hands by your side and then as quickly as possible clap and bring them back to your sides. This is actually a longer movement for your arms than it is when you go from pushup to clap, but because there is no fear of smashing your face on the floor, it’s easy to do. In fact when you realize how easy it is to do and how quickly your hands move, it should help you overcome the fear of not clapping fast enough. Do it several times until you feel comfortable and confident in your hand speed.
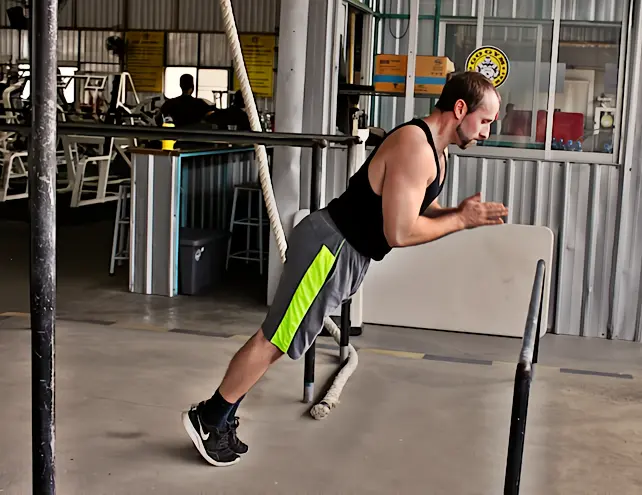
Starting position for clapping drill
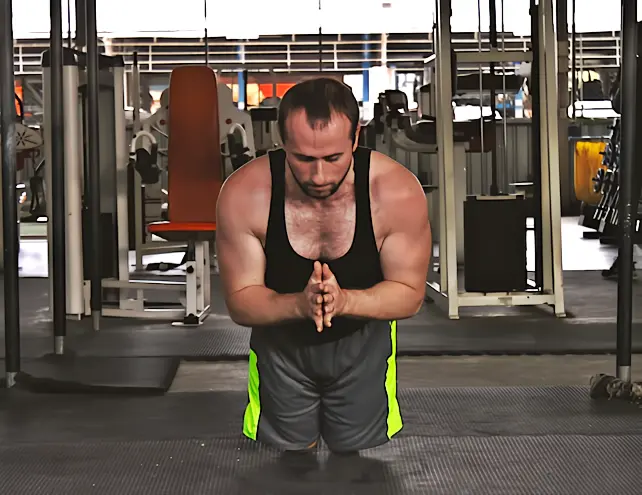
End position for clapping drill
Do a few reps using pushup regressions first.
You can do either the on-your-knees pushup or the upper body elevated pushup. Because both of these de-load your body, you can generate more hang time in the air to perform the clap and catch yourself comfortably.
Elevated clapping pushup regression
Kneeling clapping pushup regression
If these feel easy, then you are ready to get down on the floor and try the real clapping pushups.
For an added confidence boost, when you try them the first time, do it with a soft surface under you. This will also ease the impact on your wrists as you catch yourself on the way back down.
If you’ve followed the steps outlined above correctly, you will hopefully have clapping pushup success.
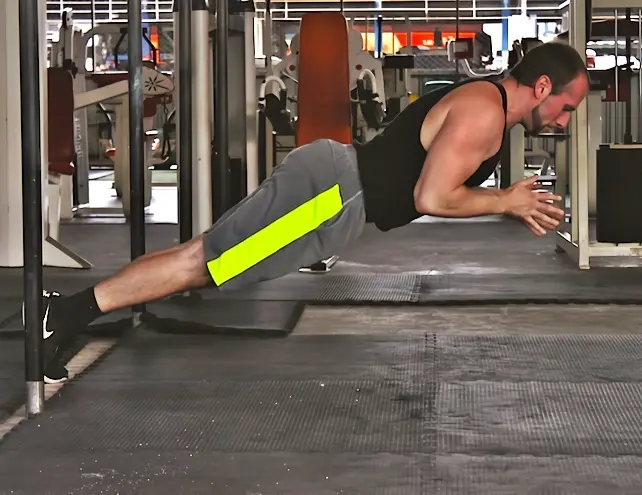
Basic clapping pushup - side view
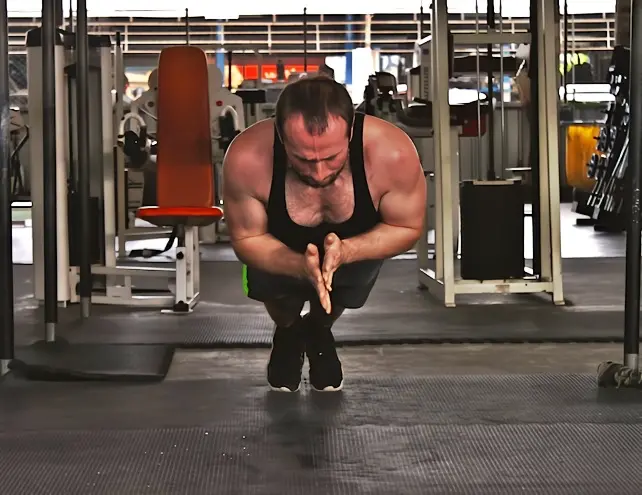
Basic clapping pushup - front view
How to Do Advanced Clapping Pushups
Once you master the basic clapping pushup, the next step is to try to see if you can clap behind your back. This requires significantly more explosive power, hand speed, and of course confidence.
The way you do it is to break it down into manageable chunks.
Remember the hand speed drill from above?
Well you will do something similar but instead of being in a safe, standing position, this time you will do it as part of an actual plyometric pushup.
Tapping the sides of your legs / hips is a first step to being able to clap behind the back. The journey your hands have to make mid-air is shorter and therefore the movement is both physically and psychologically easier to perform.
The setup is the same:
-
You get into a pushup position.
-
Lower yourself down.
-
Explode on the way up.
-
Release your hands from the ground and try to tap the sides of your body as quickly as possible before bringing them back in front of you to catch yourself.
You may not get it the first couple times but as you keep doing it, you should get closer and closer. Eventually you’ll get it.
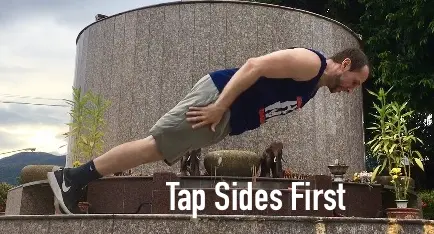
Behind the back progression - side tap
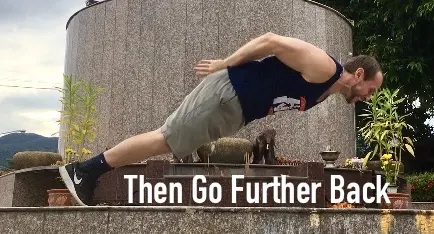
Full behind the back clapping pushup
Once you feel comfortable tapping your sides, the next step is obviously to take the arms further back. You just repeat the process.
Trying to get those arms closer and closer behind your back until they eventually touch, make that magical ‘clap’ sound and then make their way back around in time to catch you.
This just continues along.
Every time you get comfortable with a step, you try to extend it out a little further.
So once the behind-the-back-clap becomes fairly easy, then try to hit a double clap. As your hands are making their way back to the front of your body, instead of catching right away, put them together to squeeze a front clap in before you catch yourself on the floor.
You can eventually progress towards doing a front, back, front triple clap. I’ve even seen people do a front, back, front, front quadruple clap before. The sky is the limit. Eventually you might even find yourself doing some ‘floor game.‘
Plyometric Pushups
Floor Game is a term that has been coined to describe the creative world of pushup freestyle. While not quite as advanced or awe-inspiring as breakdancing, it is a fun display of pushup ability where a practitioner weaves together several different pushup styles into a sort of ‘pushup dance’.
There is no set agreed upon origin of who came up with the term but it has become very popular on social media channels like Instagram where even the term #FloorGameFriday was trending for a while.
Most high-level calisthenics athletes look at it as a fairly easy thing to do and as a way to conserve energy between more demanding bar sets. Because the barrier to entry is lower than it is for bar work, you’ll see people from across the fitness world who aren’t even necessarily into calisthenics still do pushup freestyle.
As you advance in your calisthenics practice and learn different kinds of pushups, you’ll be able to start putting together your own floor game sequence too.
Final Thoughts
That’s it. Thanks for reading and be sure to check out the other pushup tutorials I have as well.
If you use this guide to achieve your first plyometric pushup, please tag @kalisthenics_nomad and #CalisthenicsNomad in your success post on Instagram. I may even repost it to feature you!