How to Do One Arm Pushups: Complete Training Guide
Approximate Reading Time: 10 Minutes
The one arm pushup was perhaps made most famous by none other than Sylvester Stallone in his legacy role as Rocky.
In the now classic training montage that Rocky movies would become known for, Stallone cranked ‘em out for reps while preparing for his bout with Apollo. Ever since then, every guy at some point in their life has wished that they could do the same. Some went on to accomplish this feat of strength, while for others it would remain a pipe dream. There are of course plenty of strong women out there who have also achieved it.
For those of you who are working on it, I’m going to teach you exactly what you need to do to unlock it.
I will divide this tutorial into progressions. I don’t want to say that they are from easiest to hardest because we are all unique in our abilities and what may be easier for one person might be harder for another. But what I will say is that you should probably employ several of these into your regimen as you build your way up to achieving the actual one arm pushup.
They will all challenge and stimulate your body in different ways, but ultimately lead to the end result you want. Of course if you aren’t ready for a particular progression yet, then don’t dive into it. Keep working the ones you can do until you get strong enough.
One important thing to keep in mind before you begin is that you cannot approach the one arm pushup the same way as a classic, two arm pushup. Due to the considerably larger load placed upon the working arm and the unevenness of the exercise, you should strive to create more tension in your body. Tension translates into strength.
Before you start lowering your body down, brace your abdominals and flex your non-working arm as well. This will not only help you keep balance, but it will help you maintain control over your body as you lower it and press it back up. I discuss this more in the second section (play around with planks) below.
With that out of the way, let’s get started!
Elevate Your Upper Body
Just like the classic pushup, the easiest way to regress the one arm variation is to elevate your upper body.
The higher your upper body is, the easier the pushup becomes.
If you really wanted to, you could use this progression by itself and eventually get to the full one arm, but I wouldn’t recommend doing that.
It’s one tool in the tool box.
Start with a height that allows you to complete 6-8 clean reps for at least 5 sets.
If you get to the 5th set and the 8th rep is fairly easy (and you could probably do more), then your upper body is too high.
If you train at a commercial gym, one easy way to track your progress is by using the Smith Machine. The Smith Machine allows you to adjust your starting height in equal increments so you can move down one level when the level you’re on becomes too easy until you eventually reach the floor.
If you train at a park and it has low bars made for pushups, you can use those but they might be too low for some of you. Just find any surface that allows you to work at an elevation that challenges you.
As far as foot position goes, typically for a one arm pushup we straddle our legs. While in theory, there are claims of people being able to do a ‘perfect’ one arm pushup with the feet together, I have yet to see it in person.
As you get stronger you can certainly keep bringing your feet closer and closer together, but there is a limit to that before your form starts to break down on the actual rep.
The takeaway here is that whether you are working on your regressed, upper-body-elevated pushups or if you have moved on to try the real-deal on-the-ground one arm pushup, you’ll want to keep your legs fairly wide when you first start. This will decrease the difficulty of the exercise.
Once you get comfortable and your strength develops, you can bring them in more. In my experience, a really strong bar athlete can probably bring them in to about shoulder width while still keeping their form clean. Any closer than that and we start to see some serious slithering snake action.
Play Around With Planks
A lot of calisthenics moves require different degrees of skill, strength, balance, flexibility, etc. With the one arm pushup, cross-body tension is one of the factors that goes into successfully achieving it, and utilizing plank variations is an excellent way to develop that.
If you remember from the planks tutorial, they are performed by generating full body tension. You not only activate your core, but you also squeeze your glutes (buttcheeks) together, flex your quads (upper part of your thigh) and press the ground away from you. Your body should be one solid, tense unit or ‘plank’ if you will.
If done correctly, planks will prime your body to create the necessary tension you need for a one arm pushup. Because of their unilateral nature, one arm pushups require a much higher degree of tension than you can get away with on the standard pushup.
To be more specific, you need to generate cross-body tension to counteract the misbalance created by being only on 3 limbs instead of 4. Performing planks is a great way to begin acclimating yourself to what this feels like.
If you already have the ‘full body tension’ thing down (or once you get there), I would then recommend simulating the top part of the one-arm pushup by doing – you guessed it – a one arm plank.
How To Do It (And What Not To Do)
The same idea applies here – tension. Don’t just get into a lazy one arm plank and lay into your locked out elbow joint. It’s easy to do that but won’t quicken your progress on the one arm pushup.
Create that maximum tension and start getting a feel for what that cross-body tension feels like. It should happen pretty naturally since you will be off balance somewhat and generating it will be a natural response to keep you from tipping over.
💡 Don’t forget to utilize your foot width adjustment as needed! The wider your straddle the more balance you will have.
Once you get comfortable with the one-arm plank, then try the ‘one-arm, one-leg plank.‘
This one will challenge your balance even more and will require you to generate probably even more tension than the standard one arm pushup itself. This is a good thing because if you learn to generate more tension than you need for the actual exercise, then that aspect of the move will be taken care of. You can then turn your attention to building the other things that go into the move. Namely building up strength in each of your one arms to press yourself up.
For examples of what all of these various plank variations look like, please go to the planks tutorial.
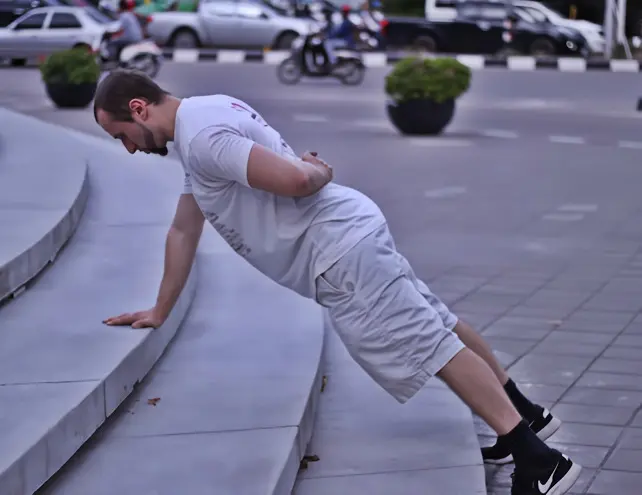
Do Self-Assisted One-Arm Pushups
Once you get comfortable with the one arm plank variations and you feel that you are ready to move on to the next step, you can try self-assisted one arm pushups.
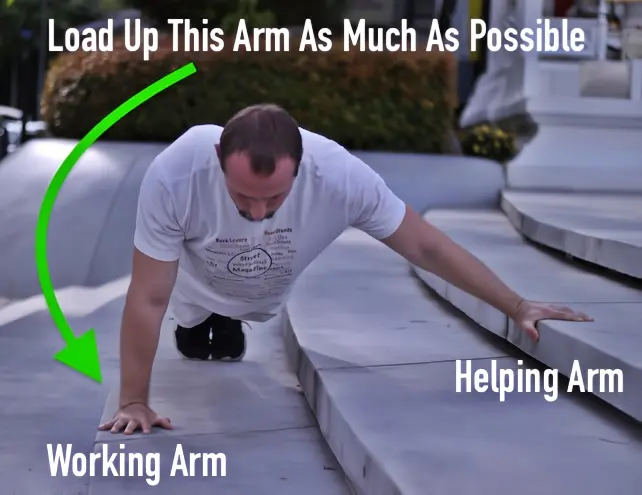
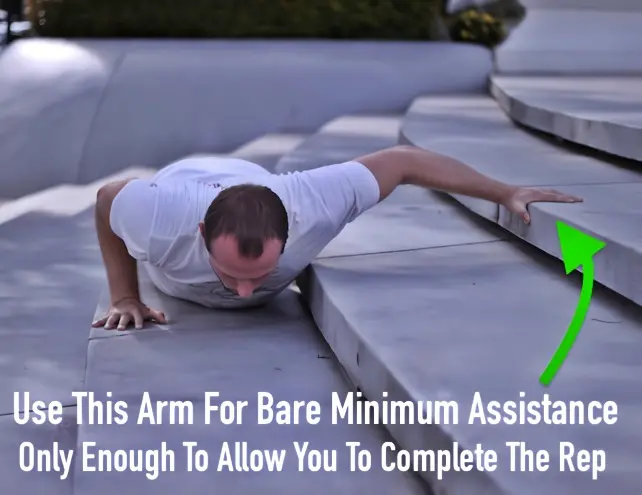
The strategy for self-assisted one arm pushups is to place as much of your weight onto the ‘working arm’ as you can handle by using the ‘helping arm’ to do some of the work. As you increasingly get stronger, you help yourself less and less until eventually only the one arm is doing all of the work.
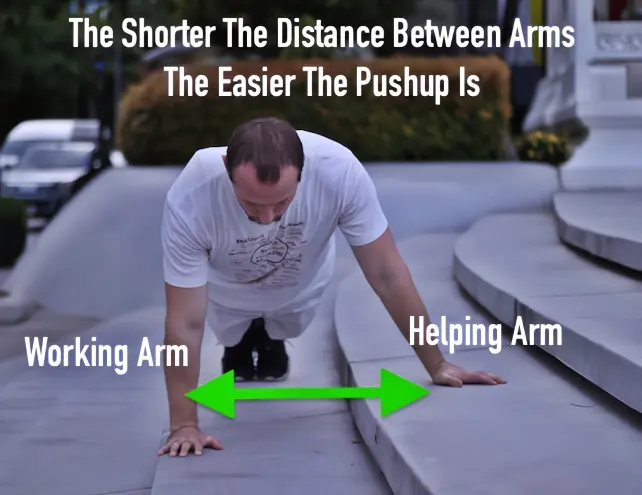
Aside from adjusting the amount of force you are generating with the helping arm, you can also scale self-assisted one arm pushups by manipulating the distance between the working arm and the helping arm.
The closer the arms are to each other, the more they resemble a normal pushup and the easier they are to perform. As you begin to generate more space between them, the difficulty level increases:
Stage 1: Top position with arms closer together
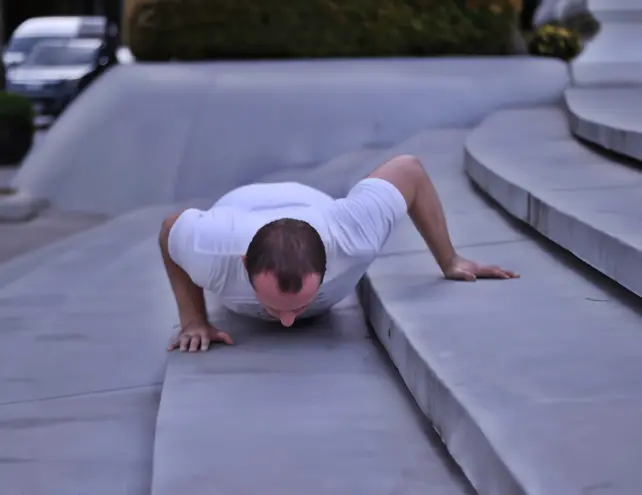
Stage 1: Bottom position with arms closer together
Stage 2: Top position with arms further apart
Stage 2: Bottom position with arms further apart
Do Modified Archer Pushups
The ultimate expression of the self-assisted one arm pushup is the ‘archer pushup.’ The archer pushup is named so, because the body alignment at the bottom of the rep looks like an archer holding a bow and arrow.
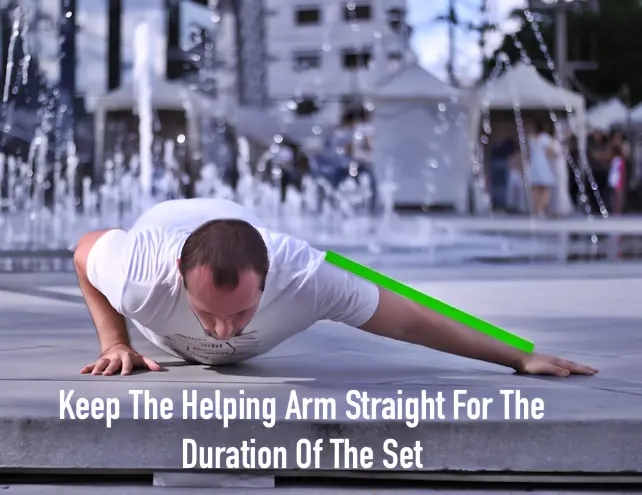
The classic archer pushup has the practitioner gliding back and forth between sides, but for one-arm pushup work, I prefer ‘pseudo-archer pushups’ where instead of gliding, you maintain the helping arm in a straight-arm, elbow locked out position.
This way you can place all of your focus during each set on generating power in the working arm for reps. It might only be one rep to start and that’s fine. Just do singles until you can do more.
The helping arm simply presses down against the ground as much as needed to help you, but making sure to maintain the elbow in a locked position.
The side benefit of doing these is that you will also be building some minor straight arm strength in the helping arm, which will be useful later on for more challenging things like the planche:
Archer pushup - left hand working
Archer pushup - right hand working
Beyond Regular One Arm Pushups
There are many ways in which you can progress the one arm pushup and they usually involve combining different skill sets.
For example, if you develop the strength to achieve the one arm, you can combine it with any of the variations learned in the playing with hands tutorials. Going from a regular one arm pushup to a fingertips one arm pushup is a whole other ball game:
One arm fingertip pushup demonstration
You can also do clapping one arm pushups:
Clapping one arm pushup demonstration
Pretty much any of the other variations that are done on two hands are fair game with one hand. They’re just a lot more difficult.
Another option is to play with digits. If you get comfortable with the one-arm pushup, you can go for the one-arm-one-leg pushup. This variation requires even more core stability than the standard one-arm. If you are going to attempt it, make sure you lift opposite limbs. So if you are pressing with your right arm, then you will lift up your left leg for counter balance. The jump from the one arm to this one is pretty significant and will take most people some time to achieve even if they find the one arm to be somewhat easy.
You can also add weight. I generally don’t like to encourage this as an option simply because this is the default go-to for 95% of the fitness population and it’s not always the best choice. But I’d be lying if I said that I don’t enjoy doing it myself from time to time.
Final Thoughts
One arm pushups are a great example of total body cohesion. Many strong individuals who can bench press heavy weight are unable to perform even a single one arm pushup. This is due to the complex nature of the exercise. It’s not simply a pressing movement. There is balance involved and considerable core strength is required as well.
I hope the progressions above were helpful to you.
If you use this guide to achieve your first one arm pushup, please tag @kalisthenics_nomad and #CalisthenicsNomad in your success post on Instagram. I may even repost it to feature you!