The handstand progressions we will cover in this tutorial are aimed at beginner-level inversionists. They are very straightforward, and you might even say ‘simple,’ but when done correctly and frequently, they will yield the results you seek (i.e., unlocking the freestanding handstand).
The first is the tried and true method of using the wall. There are two ways to approach it. Each way has its own benefits, and we’ll cover them both.
The second also uses the wall, but incorporates a new element – toe taps.
The third is perhaps the most important because once you learn how to bail, you can begin to practice away from the wall safely, and that’s really when the magic starts to happen. After all, if you never leave the wall, how do you expect to balance on your own?
That’s not to say that the wall should be abandoned altogether. The wall will always have its place. It just means that at some point, you need to allocate practice time that excludes the use of the wall. Learning how to bail will allow you to do that.
⚠️ Prerequisites
No rotator cuff or shoulder injuries. Generally healthy. Comfortable with being upside down or with getting over the fear of being upside down. It is also recommended (though not required) that you be able to hold a headstand for 30 seconds or longer.
The convenient thing about all of these progressions is that you don’t need to go anywhere special to do them. With perhaps the exception of the third one (depending on the size of your living space) you can do them at home. With that said, let’s get into it!
Table of Contents
- Using the Wall for Handstands
- Handstand Technique Explained
- How to Do Wall Toe Taps
- Learning How to Bail
Using the Wall for Handstands
The wall will be your best friend throughout your handstand journey. Even when you get somewhat proficient with holding a freestanding handstand, you will still return to the wall to refine things.
In your case, as a beginner, the wall is there mainly to keep you from falling. The fact that it keeps you from falling allows you to focus on the various internal nuances that need to take place in order to hold a handstand.
Since the handstand requires the participation of the entire body, when first learning it, it can feel overwhelming to remember all of the different elements. When you use the wall, you can sort of decompartmentalize these different components and work on them separately.
As your CNS (central nervous system) learns and absorbs a component, you can then introduce another, and just follow this process until you are doing everything you need to do when holding a handstand.
We will go over those things a bit later. First, let’s introduce the two ways we can use the wall.
Back Against the Wall (Easier)
Find a dense wall that you won’t accidentally damage when kicking up.
Once you have your wall, position your hands on the floor, about shoulder width apart, and about 1.5 feet / 45 cm away from the wall.
Pick which leg you are going to kick up with.
When ready, violently kick up with the leading leg and allow the other one to follow. I say violently because most people don’t use enough force when they first try to kick up. As long as you are using a thick, dense wall, then you shouldn’t worry about kicking through it.
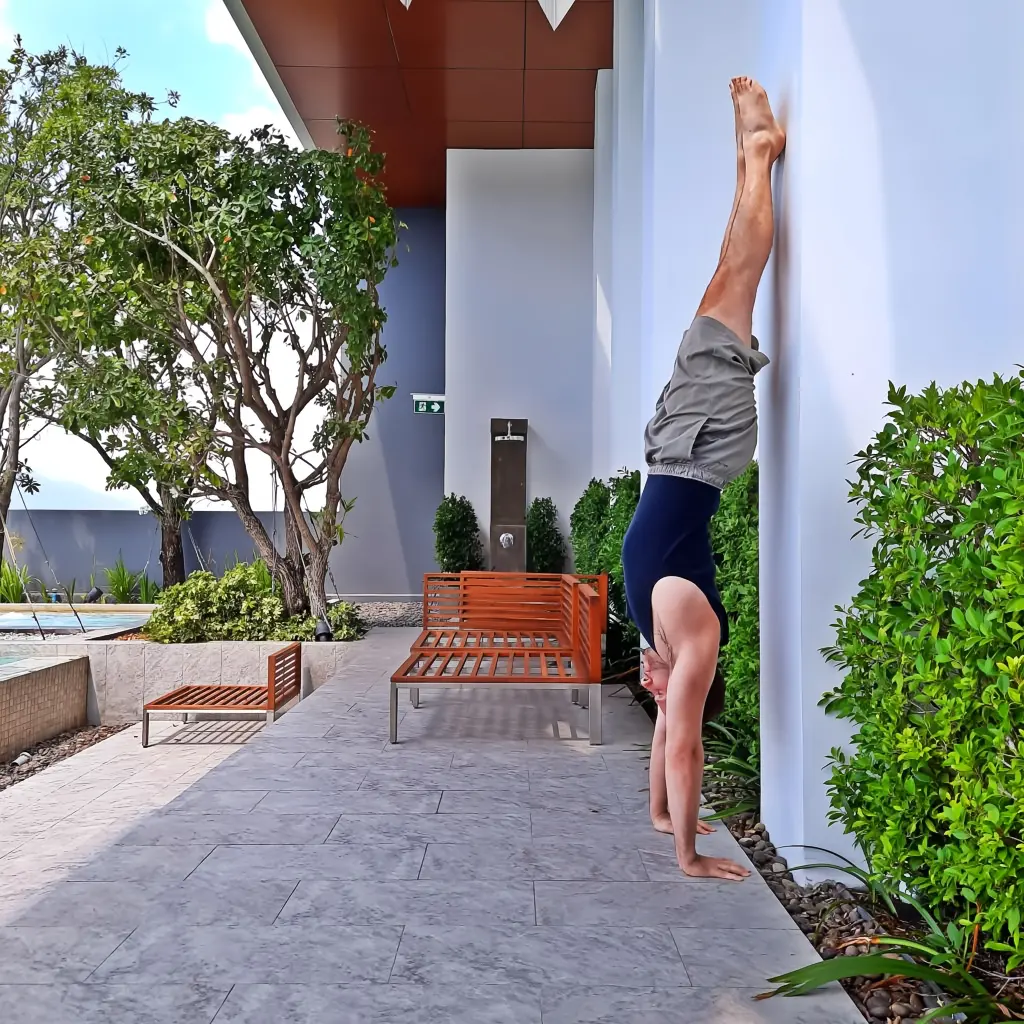
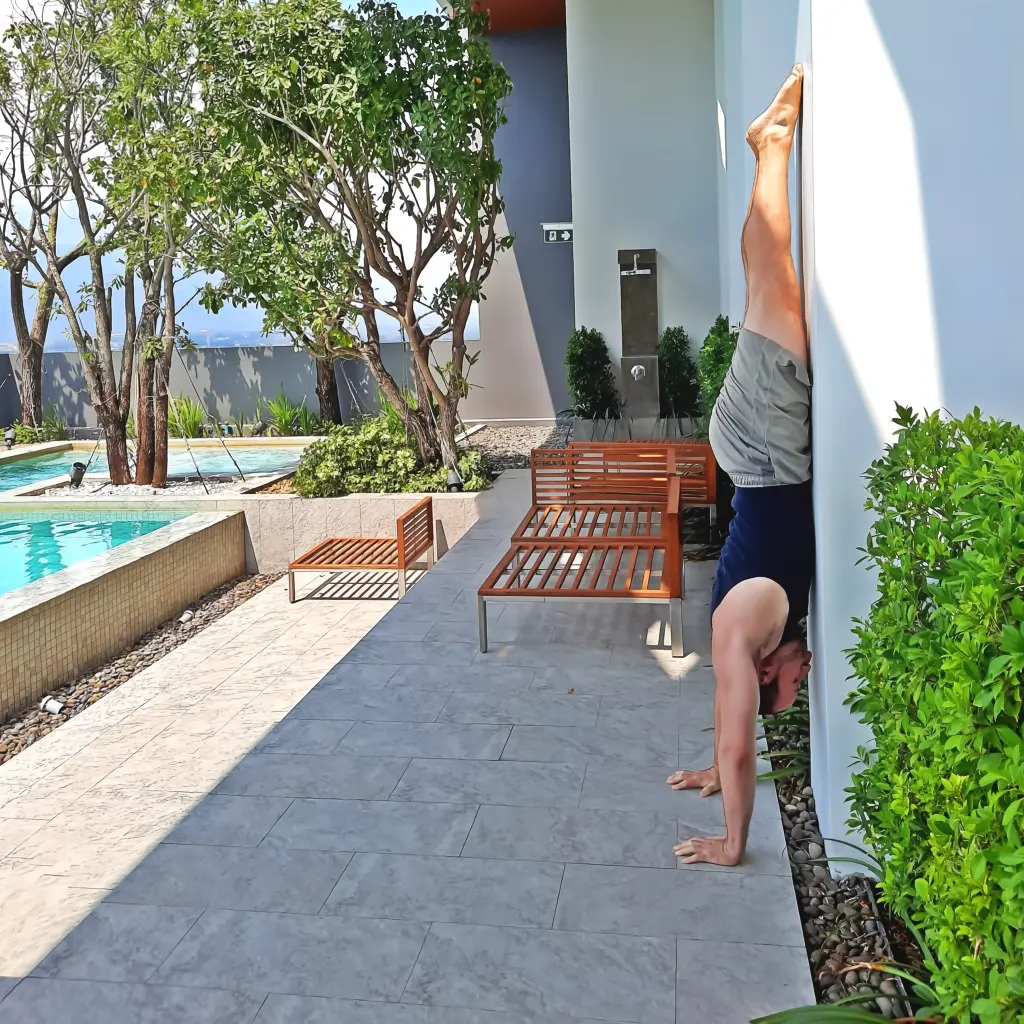
Face the Wall (Harder)
The way you get into this wall hold is by hand-walking backwards into it.
Begin in a feet-elevated pushup position with the wall acting as the support for your feet.
Then walk using your hands towards the wall. At the same time as your hands are moving towards the wall, your feet should be climbing upwards.
Eventually, you will end up in a handstand with the front of your body facing the wall.
The truest expression of this, when you see gymnasts do it, is that they will be so close to the wall that they can kiss it. The reason they are able to do this is their perfect alignment. You can only get that close if you are doing a perfect handstand where everything is stacked from top to bottom.
This is considerably difficult for many people.
The other aspect of getting that close is that if you lose balance, then you will uncomfortably fall out of it unless you already know how to bail, and even then, it can be awkward.
I have met a few individuals who find this version of using the wall easier, but I would say that they are an exception. The one element that potentially makes it easier is control. Since you aren’t wildly kicking up and instead you are walking backwards into it, it can feel psychologically easier (even though it is physically more taxing).
It looks like this:
Which Method to Use
The answer is whichever one works best for you. My opinion is to try both, but start with the back-against-the-wall variation. The other way is great practice when you are trying to work on handstand alignment, but when you are first simply trying to catch your balance, then the back-against-the-wall method is more efficient. You can get in and out of it very quickly, and it doesn’t zap your strength anywhere near as much as walking backwards into it, which means you can practice balancing for a longer duration of time.
Okay, with that out of the way, let us revisit the things you should be focusing on once you are upside down.
Handstand Technique Explained
Before I explain the other two handstand drills, I want to review what the different parts of your body should be doing while you actively try to maintain your balance during the handstand.
Hands and Fingers
The hands and the fingers are how you will correct your balance when one of the other elements starts to give out on you. For that reason, they are arguably the most important aspect of the handstand to learn if you want to start balancing as quickly as possible – especially if you’re a beginner.
Don’t get me wrong, all of the elements are important, but you can get away with some of them and still hold a freestanding handstand if you get the hands and fingers thing down.
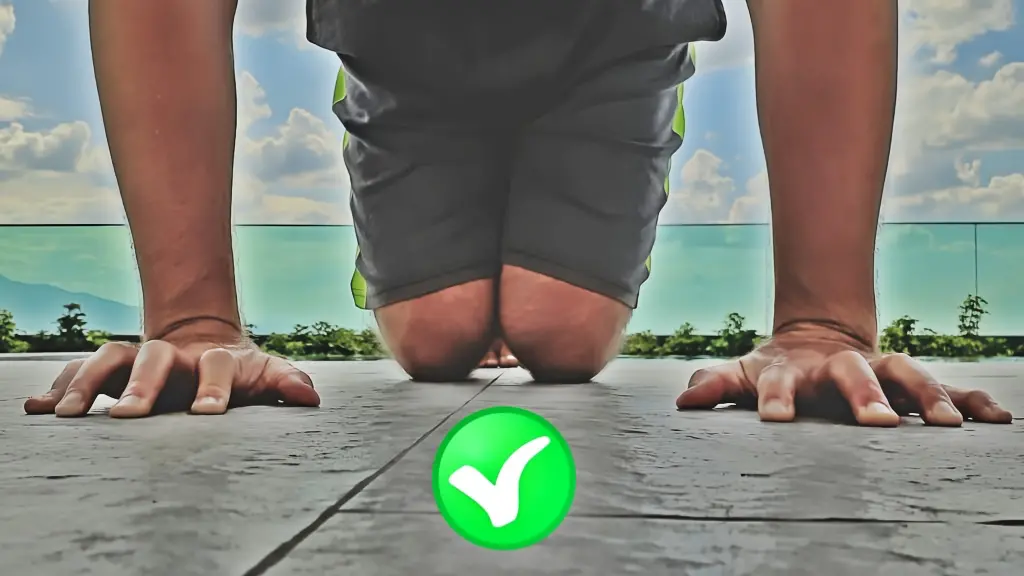
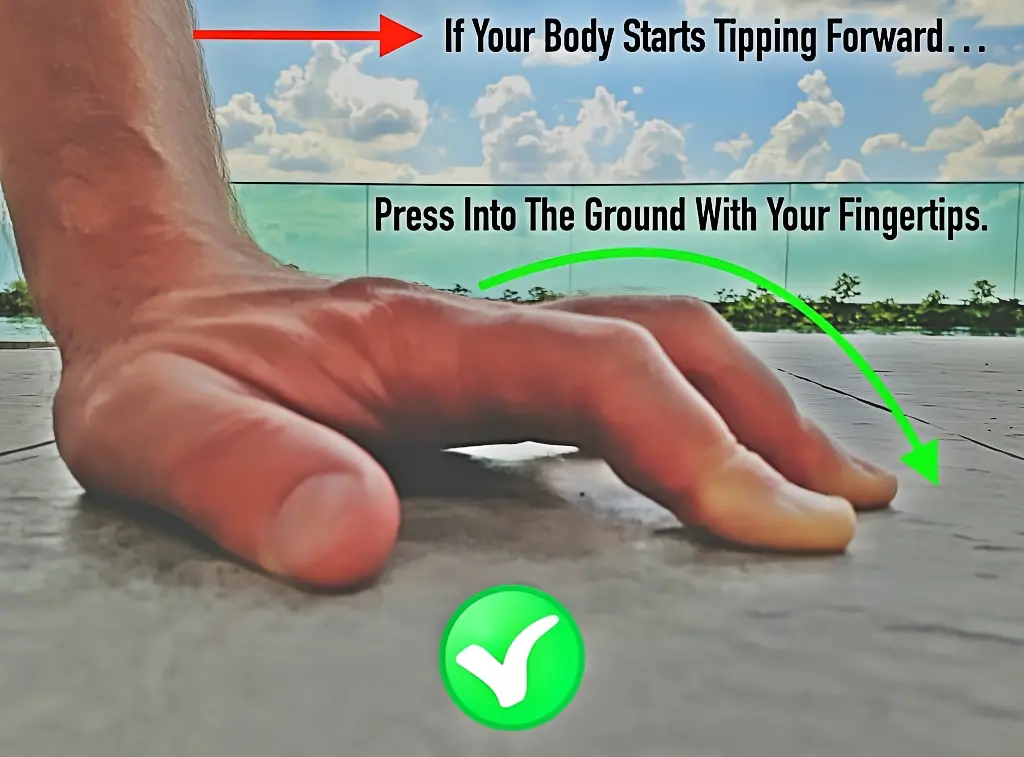
The way to do it is to put your fingers in a curled position. The curl is so that you have more leverage from above your fingertips to drive force into the ground.

Correct: Fingers curled for leverage

Incorrect: Flat hand position
If you feel your body tipping forward too much, then you will press your fingertips into the ground to counterbalance that tipping forward feeling. Converse to that, if you feel yourself falling backwards, you will relax the fingers and drive the back of your palm into the floor to balance you out the other way. It’s almost like an invisible see-saw.
The thing is that if you get really good at the other elements below, then you won’t have to rely on this see-saw dance so much. Of course, that takes a lot of time and it’s not easy, which is why it’s good to master the hands and fingers as quickly as possible. Then you can slowly work on the other things.
Shoulders and Upper Back
To correctly execute a quality handstand requires you to perform an upward scapulae rotation and hold it. In case you have no idea what that means, do the following in a standing position:
- Begin with straight arms.
- Raise them overhead.
- Now try to push up so that the inside of your shoulders make contact with your ears.
The mechanism behind making that small movement is the upward scapulae rotation. Depending on how tight you are could affect how effectively you are able to do it. Keep in mind that this will also be an indication of how it will affect you when you are in an actual handstand.
Once you are upside down, you will want to replicate this upward pressing motion. Imagine trying to push your body away from the earth, but without bending your elbows. Remember to keep them locked out. If done correctly, you should feel your body rise slightly.
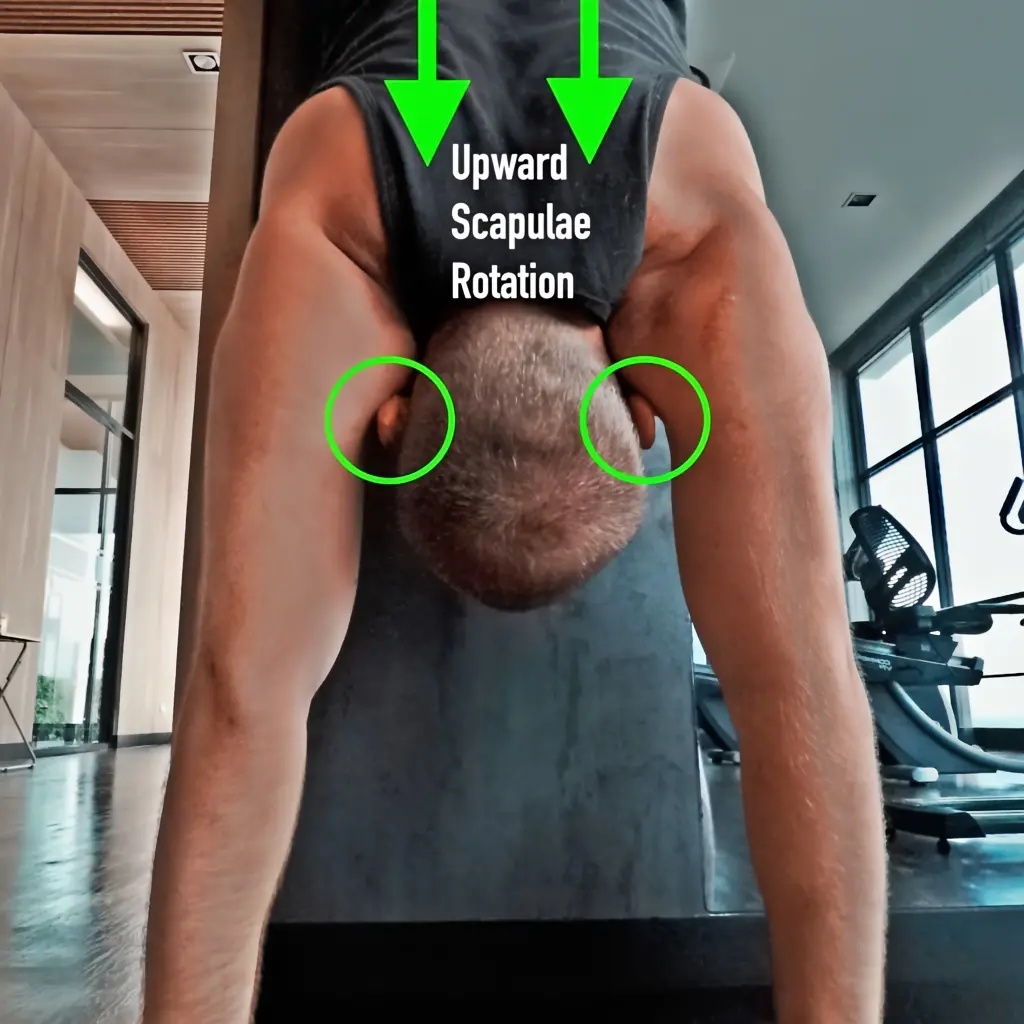
Correct: Active scapulae rotation

Incorrect: Relaxed, fatigued scapulae
The idea is to stay in this elevated position, but the reality is that you will likely fatigue and will get the urge to sink back down. When you get good at balancing with the hands / fingers, you’ll be able to sink down and still maintain your balance, but the goal is to refrain from doing that for as long as possible.
Rest of the Body
Abs / Core
This one is pretty obvious – keep your core tight. The visualization should be that you are drawing your belly button in towards your spine and then squeezing your abs to keep them tight. For me personally, this is the most challenging aspect of holding the handstand. It’s also why I’m still banana-back handstanding more than I’d like to be.
Glutes
Squeeze ‘em! That’s it. No elaborate explanation is needed.
Knees / Quads
The knees should be locked so that you feel your quads (front thighs) flexing. The name of the game is tension. Keep that tension going from top to bottom.
Toes
Point your toes. This is done not only for aesthetic reasons, but it also helps to create tension in your calves. If you have decent to great alignment, all of this tension, starting with the toe pointing, will create a solid plank out of your body. If you have immaculate alignment, then you will be fully stacked in a straight line (of tension). Most of you will not be fully stacked, but it’s something to strive for. I’m still working on it, too.
Handstands and Longevity
Did you know that practicing handstands has been shown to promote cerebrovascular elasticity and potentially delay signs of aging? You can read the abstract of the actual study yourself, or read my synopsis below:
First, it’s important to note that this study was based on “passive” handstands rather than “active” ones. While I can’t say for certain that active handstands would have the same benefits, it’s reasonable to assume they might provide similar or even greater advantages due to the increased neuromuscular activity involved in maintaining the position without assistance.
The study involved a 66-year-old Chinese man who used a specially designed device that allowed him to hang upside down. He did this almost daily for 40 years.
Following the 40-year period, the participant was examined for various health markers: his cerebral vessels remained healthy, he had a younger appearance relative to his peers, his cervical spondylosis improved, and his mental state and cognitive function were good.
The purpose of creating all of this tension is to make your body into a unified, solid object because that is much easier to balance than dead weight that’s flipping and flopping in all sorts of directions.
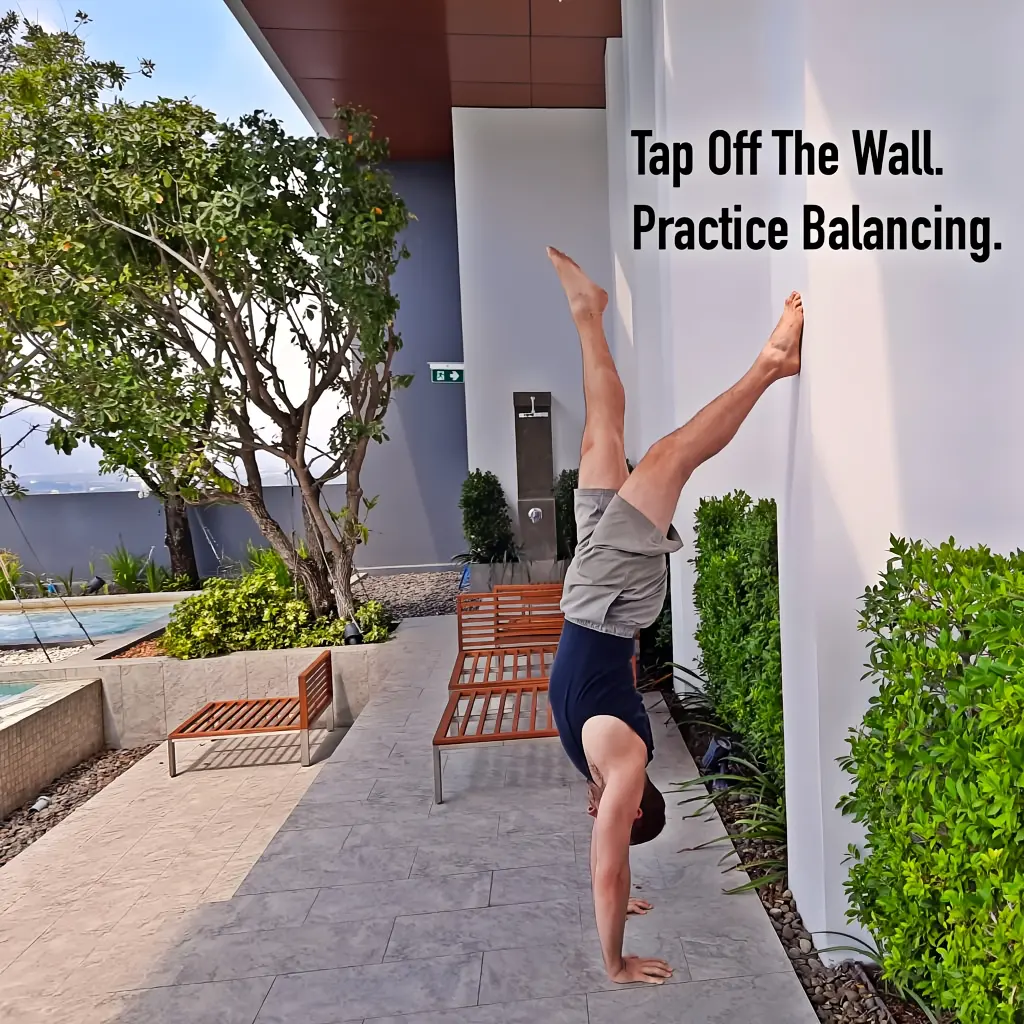
How to Do Wall Toe Taps
Once you get comfortable holding a handstand against the wall, you’ll want to introduce toe taps into your routine.
Toe taps will allow you to work on your balance. If done often enough, you should be able to unlock the freestanding handstand.
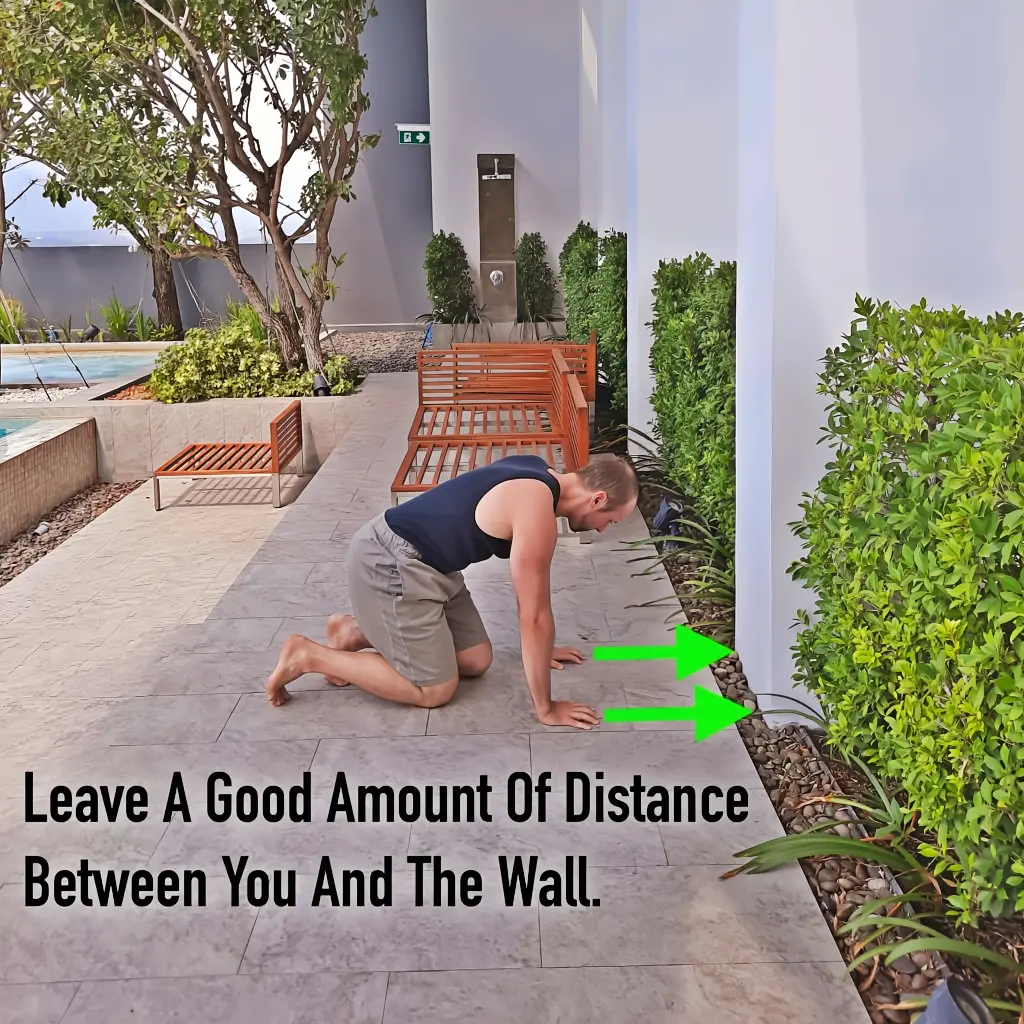
The way to do them is very similar to getting into an against-the-wall handstand. The major difference is that you’ll want to purposely create a bigger gap between you and the wall. That gap is where the magic happens. It’s where you create the illusion of performing a freestanding handstand.
Although the wall will be there as your support, to your body and your CNS, you’ll effectively be in a freestanding handstand. To keep you from falling, it will have to begin recruiting motor units that it may have never used before.
The first however-many-times you fail will usually send you falling towards the wall. You’ll simply pause for a moment and then tap off to try again – hence the name toe taps.
Earlier, I mentioned that you should position yourself about 1.5 feet / 45 cm away from the wall. For toe taps, you’ll want to position yourself even farther than that. Initially, you may feel slightly paranoid about creating that much space, so ease into it at your own comfort level.
Step 1: Starting position
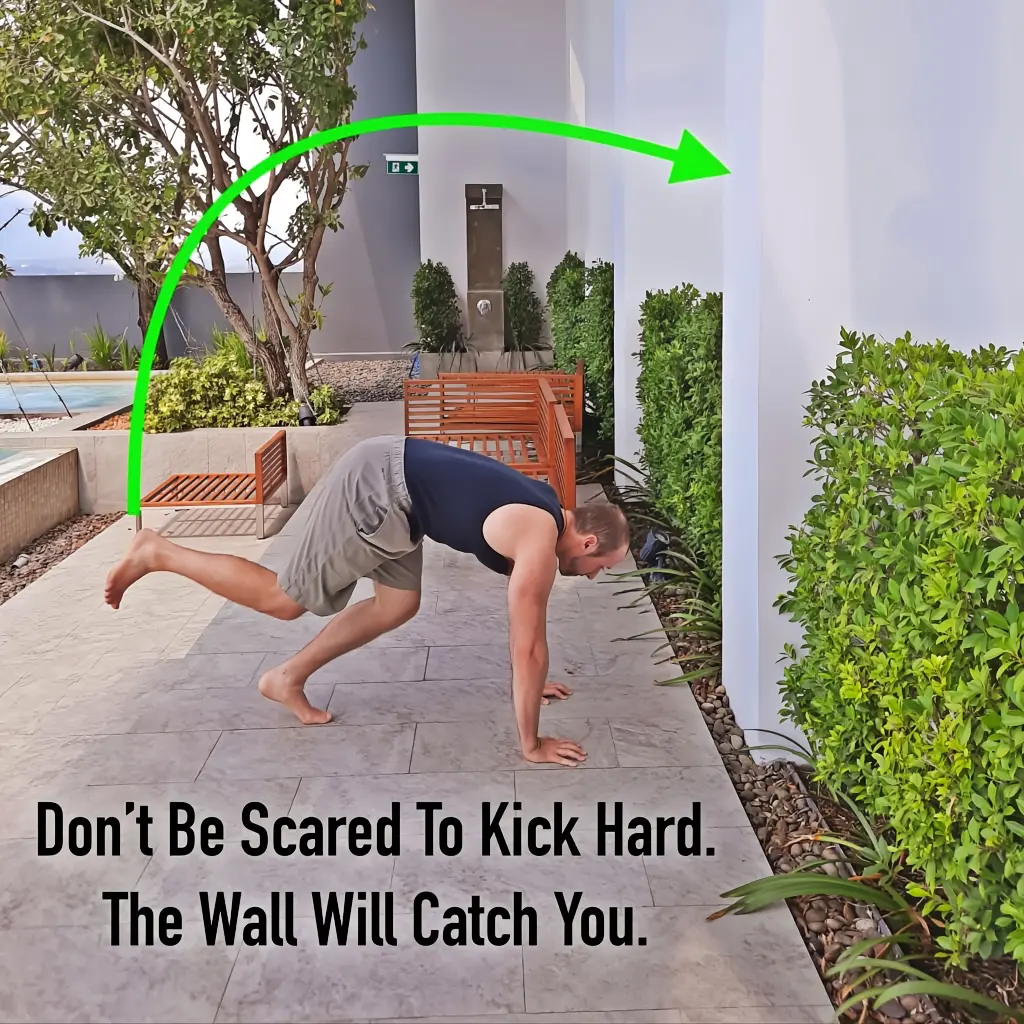
Step 2: Kick up preparation
Step 3: Toe taps execution
Learning How to Bail
This is where the training wheels come off. It’s the magic sauce that will allow you to practice handstands as much as you want without the fear of busting your head open.
There are two basic ways to bail from a handstand. One is significantly more practical than the other. Let’s cover that one first.
Handstand Bail Method #1: Half-Cartwheel
Here’s the thing about falling out of a handstand – you can semi-control the trajectory of your fall by incorporating simple body mechanics. I want you to think about what your arms are doing when holding a handstand and then think about what happens when you lose balance and start to tip over.
When most beginners begin to lose balance, they will do one of two things:
They will either keep their elbows locked and tip over in a forward or backward direction (depending on which direction they lost balance in), or they will unlock their elbows and go flying into the ground with a possible tipping/tumbling added on.
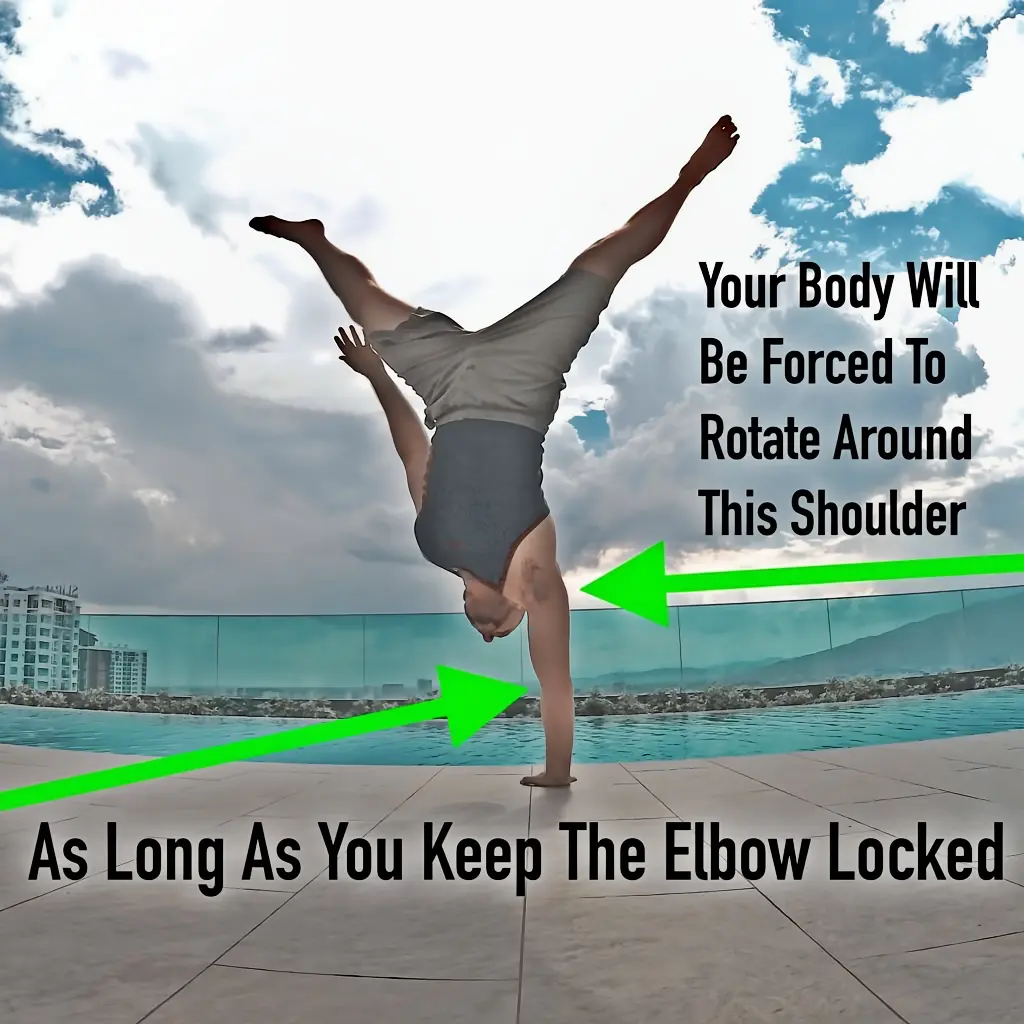
Neither of these approaches is good, but I brought them up to draw attention to the fact that it is the arms that are largely responsible for how you end up bailing from the handstand. The way to properly do it is to pick one of your arms to become your ‘support arm,’ and the other will be the ‘let-go arm.’ You see, as long as you keep one arm completely straight with the elbow locked out and you allow the other one to come off the ground, then your body will have no choice but to rotate around the shoulder of the locked-out arm. It will have no other way to get down. If done properly, it will look like a sloppy half-cartwheel.
If you choose to lock out your right arm, then your body should rotate to the left and vice versa.
Once you get the hang of this, you will also develop a sense of self-awareness to your falls. You’ll be able to slow down your fall, and you’ll also be able to loosely control where your feet will land. It’s something that will happen naturally over time. Just consciously focus on keeping that one arm straight with the elbow locked out. The rest will come to you after that.
Step 1: Mid-point of bail
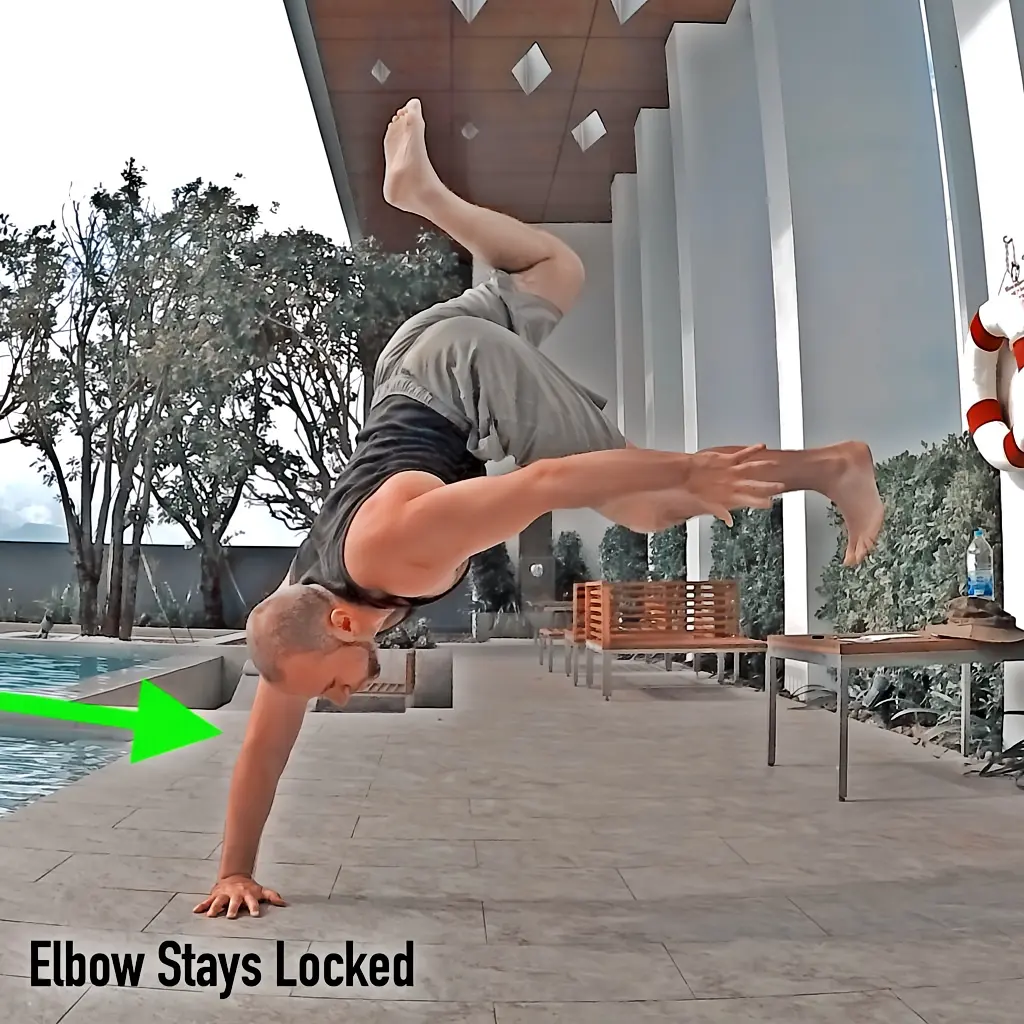
Step 2: Support arm locked
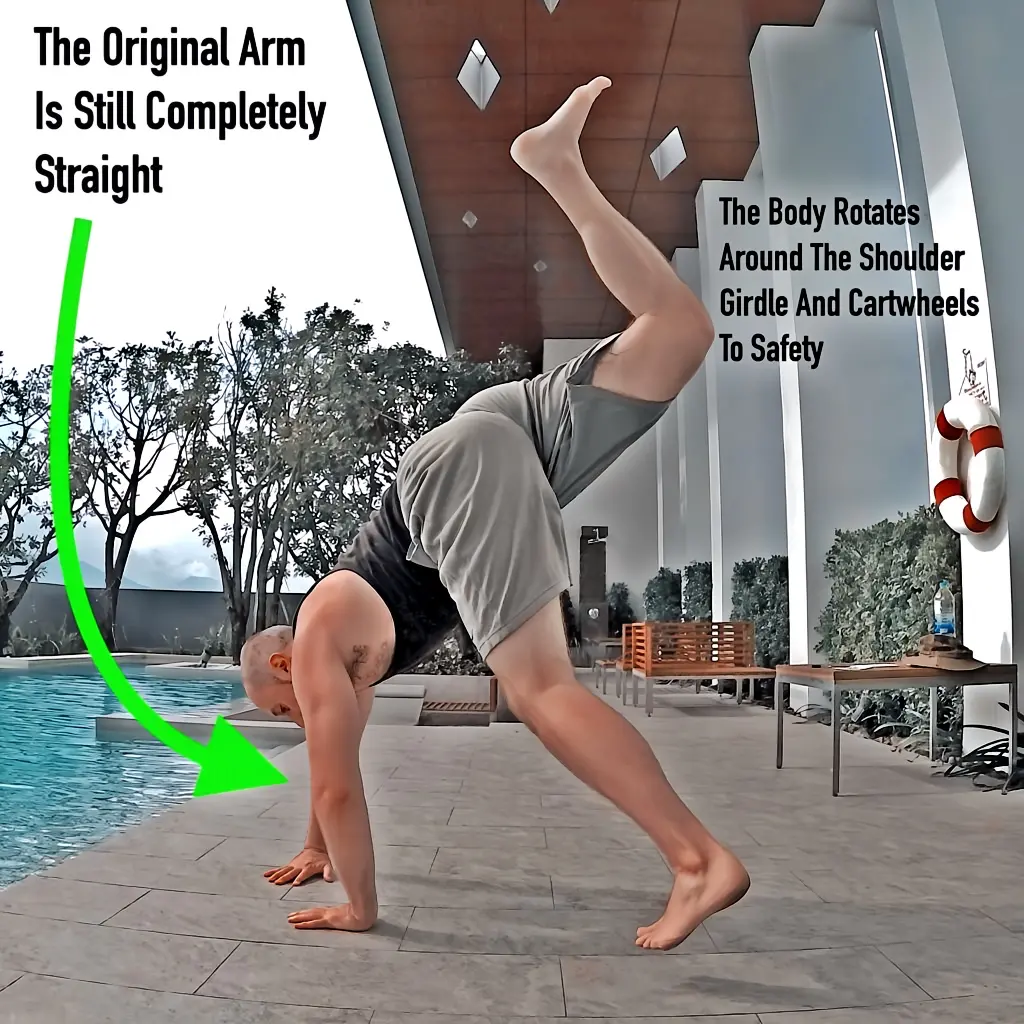
Step 3: Safe landing
Handstand Bail Method #2: Forward Roll
Performing a forward roll is an alternative way to get out of a handstand if you lose balance and start tipping over forward. It is better suitable for a padded floor and is more often done in a gymnastics environment. You may see gymnasts purposely go from a handstand to a forward roll and then into a pistol squat as a transition sequence. While I think this is fun to learn to do, I don’t think it’s better than the first method I shared with you if your goal is to work on handstand balance.
The reasons for this are:
- You need a padded floor to practice it, so it’s not as accessible. Once you know how to do it, you don’t absolutely need a padded floor anymore, but it’s certainly more comfortable.
- It requires you to learn new skills, which isn’t bad in and of itself, but when you are hyper-focused on wanting to learn the handstand, then you don’t necessarily want to be bothered with learning how to forward roll.
- It can irritate the neck and back if done incorrectly or even if done correctly in some cases.
Having said that, if you want to practice it, I recommend finding a knowledgeable coach to walk you through it. Preferably someone with a gymnastics, cheerleading or similar background.
Final Thoughts
If you made it all the way down here, I’d like to say thanks for reading. I hope this guide helped you and that you unlock the handstand sooner rather than later. It can be tough to do as a beginner, but if you stick with it and work on these drills regularly, you will get there. For context, I didn’t start learning how to handstand until I was in my mid-30s, and it took me about a year of consistent effort before I could hold a handstand for a respectable amount of time. You can do it too.
If you end up using this guide to achieve your first freestanding handstand, please tag @kalisthenics_nomad and #CalisthenicsNomad in your success post on Instagram. I may even repost it to feature you!